Sunday, December 7, 2008

6. B-Spline Test Implementation

And, finally, I have been able to implement a first B-Spline interpolation test.


This little test application loads a custom NSView subclass, where it draws a control points polyline (the blue line) and, subsequently, calculates intermediate points, using a B-Spline interpolation algorithm to draw the red curved line.

Following code shows the two methods that are actually responsible for spline interpolation.

- (CGFloat) bWithI:(int)i T:(float)t {
switch (i) {
case -2:
return (((-t + 3) * t - 3) * t + 1) / 6;
case -1:
return (((3 * t - 6) * t) * t + 4) / 6;
case 0:
return (((-3 * t + 3) * t + 3) * t + 1) / 6;
case 1:
return (t * t * t) / 6;
}
return 0;
}

- (NSPoint) pWithI:(int)i T:(float)t {
CGFloat px = 0;
CGFloat py = 0;
for (int j = -2; j <= 1; j++) {
px += [self bWithI:j T:t] * [[[self points] objectAtIndex:i + j] pointValue].x;
py += [self bWithI:j T:t] * [[[self points] objectAtIndex:i + j] pointValue].y;
}
return NSMakePoint(px, py);
}

Tuesday, September 23, 2008

5. After the Custom View is created

View Programming Guide for Cocoa points out some foundamental steps a developer has to take in consideration when creating a custom view class. They are listed in the Creating a Custom View chapter.
  1. Providing methods to allocate and deallocate the view.
  2. Drawing the view content.
  3. Marking portion of the view for updating in response to value changes.
  4. Responding to mouse events produced by user interaction.
  5. Updating mouse pointer when it is over a draggable item.
  6. Responding to keyboard events.
  7. Implementing NSResponder actions methods.
  8. Providing key-value-coding compliant accessors for its settable properties.
An important guide to understand Event Handling in Cocoa is Cocoa Event-Handling Guide. This guide covers tips regarding mouse and keyboard events and also NSResponder class.
Another foundamental document is Key-Value Coding Programming Guide that explains point 8.

4. More detailed informations about subclassing NSView

Either custom Quartz views or OpenGL views, need to subclass abstract class NSView.

In the post 1. Quartz subclassing NSView I explained the two possible methods to achieve this result. My favourite one is the first one, because it is the more reliable and compatible with different versions of Xcode.

Now I just want to note once more the whole procedure visually.

  1. In your project right click on the Classes group and choose Add -> New File....


  2. In the New File chooser windows select Mac OS X.


  3. Then, scroll the upper right scroll view to find Objective-C NSView subclass icon, and select it.


  4. Press Next button.


  5. In the next view, give a name to your class and press Finish button.


  6. Make both Xcode and Interface Builder visible and drag your custom view header from Xcode project window to the NIB window, in Interface Builder. If Interface Builder is not opened yet, double click the MainMenu.xib file, in the Resources group of your Xcode project, to open it.


  7. In Interface Builder, select a custom view instance.


  8. Open Inspector (COMMAND-SHIFT-I), move to the Identity panel and choose your custom view class from the Class drop down menu of Class Identity subsection.


Now the custom view instance, in Interface Builder, is defined as an instance of your custom view class. And you can operate on it editing your custom view class code.

Thursday, August 21, 2008

3. Spline Interpolation

I have been away from this pages for a long time. Though, in the period passed, I red a lot of Cocoa and Objective-C tutorials and guides (expecially the Apple official guides).


One of the mandatory features of the software I want to develop is smoothing of strokes I paint with the tablet (or mouse).


Why smoothing algorithm is needed?

Tablet input data is sent to computer at a fixed sampling rate (it depends on the hardware features). Tablet hardware read pen position every n milliseconds, software takes position data and connects each position with a stright line. This means that, if the artist draws a curve fast enough, the curve will be a poly-line (i.e. a sequence of points connected by stright lines).

smooth_disabled.png
A curve stroke with the smooth disabled.
smooth_active.png
A curve stroke with the smooth enabled.


As you can see it is not natural.


To resolve this problem, professional painting softwares (like Painter or Photoshop) implemet a smoothing algorithm to grow programmatically detail between two subsequent pen positions, and give the curve a more natural appearance. These algorithms (there are several variants) are based on math functions that guarantee a good approximation and fast computing performances.


To draw curves Cocoa provides only Bezier Splines, either in the AppKit framework, using NSBezierPath methods and in the Quatz 2D functions for the CGContext.


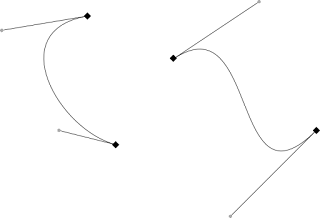
Bezier Splines are special case of Cubic Splines where you have to know 2 points (the start and the end point of the curve) and 2 control points (computer artists, who know vector applications like Illustrator, Freehand or Inkscape, use to call them "handles" because they move them to control the bias and the orientation of the curve).

bezier_curves.png
2 different oriented Bezier curves.

Though, Tablet input events do not carry any control points data. Those events pass only data about the points that stay on curve path.
This means that Bezier paths are not the solution to our problems.

Then I started searching the Web, looking for documentation about Spline Interpolation algorithms.

The mathematics, I should be proficient to actually understand deeply the theory beneath the Spline Interpolation, involve Derivatives, Integrals and many other complex things. Unfortunatelly my mathematics reminds in this fields have blanks, and so, I am currently not able to indipendently implement the algorithm starting from a math text.

Then, I browsed the Web looking for some examples that could help me to understand how to actually implement this algorithm.

And I found some...

Monday, February 4, 2008

2. What I need?

I spent the latest hours to find resources about handling tablet and/or mouse events. This to understand how difficult can be to develop such things. Of course there are several informations about it.

In the Chapter 2 of the Core Image Programming Guide, the part Imaging Dynamical System, describes a MicroPaint application that is able to capture mouse events and draw on a canvas. The guide is available either in the Cocoa area of Apple Developer Connection site and in the Xcode included documentation. Though, even if it will be soon useful, the MicroPaint application example focuses on the use of CIImageAccumulator class and not on how to actualy handle mouse events.
There is also a CIMicroPaint example in the /Developer/Examples/Quartz/Core Image/CIMicroPaint folder installed with development tools. But it is based on OpenGL and at this point it confuses me a little.
Talking about event handling there is the Cocoa Event-Handling Guide at ADC, available also in the Xcode documentation. But it does not make any example/tutorial and I want a pratical tutorial to learn quickly what to do.

So, I found the Mouse Events article at Cocoa Dev Central that introduces the reader to a tutorial for mouse event handling. I will use it for quickly understand the needed knowledge and then I will explore the examples provided by Wacom at Mac Software Development Support page.

But before to do it I want to write a list of features for my application, to understand what I actually need to know to go on.
  1. Tablet support with pressure sensitivity;
  2. Layers support.
  3. Alpha channel support, for each layer and the global image.
  4. Blending modes support.
  5. Layer transparency support.
  6. Tablet strokes smoothing to avoid stright lines when user moves the pen really fast.
Reading the Cocoa Drawing Guide, I discovered that Quartz gives support for:
  • Layers
  • Gradients (also called shadings)
  • Image data sources
  • Blend modes (Cocoa uses compositing modes instead)
  • Masking images
  • Transparency layers (for grouping content)
  • Arbitrary patterns (other than images)
That means that I can skip to project my self made layers system and use the one provided by Apple and that I can choose between two different blending systems: Quartz blend modes or Cocoa compositing modes.

1. Quartz subclassing NSView

My aim is to create a simple 2D painting application using Cocoa. I have already tried some tutorials on the basics of coding in Objective-C and Cocoa with the Apple IDE Xcode.

Xcode with its counterpart Interface Builder are two extremelly powerfull tools. Most of the work is done using interface, and they prepare automatically a skeleton of the code. Even if, for the lovers of pure coding, this could seem to be not so good, there is the advantage that the code generated this way is quite clean, compliant to Apple standards an less error prone.

I am collecting informations from a lot of different resources on line. There are two tutorial that I found particularly interesting. Those are: the Cocoa Dev Central, Intro To Quartz II, and the Episode 18 - Custom Views of CocoaCast. They basically talk about the same thing: subclassing a NSView class to create a drawing canvas.

All my experience comes from Java so I have no problems to understand Object Oriented languages, I just have some little problem to understand some C sintax but it does not rapresent a great obstacle.

So, watching this two tutorials I discovered that a class can be subclassed in two differnt ways.

  1. Using Xcode: in the Project window left list, it is possible to right click on the Classes subfolder (or any other project subfolder) and choose Add -> New File.... The Assistant will appear and it is possible to choose from a list preconfigured subclasses. Choose Objective-C NSView subclass in the Cocoa section. Then click Next. In the following view give a name to your class and click Finish. After these steps, it is necessary to drag the custom class header to Interface Builder, in the Instances panel of the NIB window to make Interface Builder aware of the new custom class.


  2. Using Interface Builder: in the Classes panel of the NIB window, search for NSView class right click on it an choose Subclass NSView. Giva a name to the subclass and right click over it. Choose Create Files for SubclassName. It will appear a dialog window. Leave it as it is, except for Insert into targets: box. There you have to make sure that your project name check box is selected. To finish click Choose.